From Newsgroup: alt.toys.transformers
Dave's Transformers Age of the Primes Rant: Deluxe wave 4
The Thirteen Quintus Prime (robot squid thing)
Targetmaster Sureshot (dune buggy-ish car) with Spoilsport
Combaticon Blast Off (space shuttle, combiner limb)
Quickstrike (Scorpion/Cobra Fuzor)
Junkion Jalopy (retool of Scraphook/Axlegrease/Tow-Line)
Permalink:
http://www.eyrie.org/~dvandom/BW/AoP/Deluxe4
Yep, a big wave. Wave 5 is due to be five toys as well, but one of them is just a repackage (Legacy Cliffjumper). Note, the labels of "The
Thirteen," "Targetmaster," and "Combaticon" are all in smaller type above the character's name, but "Junkion" is part of the proper nametag.
https://www.eyrie.org/~dvandom/BW/Legacy/Deluxe4 - original Scraphook
https://www.eyrie.org/~dvandom/BW/Legacy/TowLine - Tow-Line retool
There's also parts from the Axlegrease retool, but I never got that one, because the entire wave was a veritable ghost and I wasn't willing to put in the effort or cash for a retool (and checking now, it's at least $50 after shipping, definitely not paying 100%+ markup). Axlegrease's contribution is
a back end that makes the mold a car rather than a truck, though. Jalopy
uses the Tow-Line head. I suppose I could open up Star Raider Lockdown to check, as it's an Axlegrease retool, but meh.
CAPSULES
$28 price point.
Quintus Prime: A decent alien design (as in, something that was not part of the norm on Cybertron), my only serious dislike is how hard it is to open
up the cockpit without using a tool. Otherwise a competent design. Recommended.
Sureshot with Spoilsport: Pretty good robot mode, finicky transformation and a vehicle mode that isn't really worth the hassle. Spoilsport feels a
bit cheap. Mildly recommended.
Blast Off: I'm not in love with the colors, but they're G1-accurate so that's not really a valid criticism of what the toy's trying to do. Pretty good robot mode, decent transformation, solid vehicle mode, doomed to spend
its time in two pieces attached to Bruticus's arm. Recommended.
Quickstrike: An improvement on the original and a good toy as long as
you actually know who this guy is. The weirdness of the design might be offputting for someone without affection for the character, though. Recommended.
Junkion Jalopy: A frankenretool using bits of three different tooling runs, the original of which (Scraphook) was recommended at the time. Unlike the other three redecos/retools in this mold family, this one is in regular Junkion colors, for those looking to add to their pile of combination bits. Still annoying to transform the arms into the rear third of vehicle mode, though. Recommended.
RANTS
Packaging: Same as the previous wave.
THE THIRTEEN: QUINTUS PRIME
Assortment: G2004
Altmode: Space Squid
Transformation Difficulty: 15 steps
Previous Name Use: None
Previous Mold Use: None
Origin Universe: Aligned
Packaging: Three plastic ties across the chest and legs, double-ties on each arm, and rubber bands around the arms hold the figure together and onto the inner tray. The Emberstone is stored inside the chest.
The transformation cartouche on the front has the altmode as a bubble-dome-style flying saucer. The relic inset on the back has the label "THE EMBERSTONE" in Cybertronian. Another inset shows the cockpit area
opening up to store the Emberstone.
Robot Mode: Well, it does have legs under the tentacle skirt. Yes, yes,
I know they're not technically tentacles in the sense of being the longer attack arms of a squid, but they're clearly not squid arms either, so
tentacle in its common usage will have to do. Actually, a few bits of the skirt aren't tentacles or not-tentacles, they have flat surfaces rather than having the segmentation lines of the rest. Two on front and two on back are ribbons with molded ancient glyphs (too small for me to want to try to decipher, even if they ARE a recognized font), and they curl outwards at the ends. Two more on back and four on front are also more clothing-like than tentacle-like. The effect is to have him wearing a sort of ribbony loincloth over the tentacle skirt. The feet are even more clear than the skirt, I
expect they're supposed to just blend in and look more like tentacles than actual feet.
5.75" (14.5cm) all, although the high collar in back is responsible for the top few millimeters of that. Various shades of opaque, metallic, and
clear green with a little desaturated brown in the mix. Desaturated muddy brown is used for the secondary arms, the shoulder joints and fists of the primary arms, the back of the pelvis, the hip joints, knee joints, and some internal struts. Interestingly, under UV light this plastic looks more like the opaque green plastic. Neon yellow-green (more yellow than green) plastic is found on the back of the head (good lightpiping to the six eyes), part of the backplate, the Emberstone (which partly pokes out the center of the
chest), thighs, shins, and feet. The rubbery skirt pieces are all clear yellowish green (more green than yellow). The remaining plastic is a sort of yuck-green close to olive that reminds me of what happened as a kid when I mixed all my watercolors together. This is used for the face, shoulderpads, niceps, forearms, forearm armor, high collar, torso front and sides, pelvis front, and panels on the calves.
The main paint is a sort of metallic pale green, which is on the
forehead, much of the chest, stripes on the shoulder fronts, biceps, forearm tops, forearm armor, and the two main ribbons in the front skirt. The glyph-covered ribbons in the skirt are odd, they look more like gunmetal
under normal lighting, but under bright light they're the metallic pale
green, there might be a thickness issue or something. There's a dull darker gray-green on the undersides of the chest and the outer faces of the
forearms. Eye-like orbs on the sides of the abdomen are painted metallic purple, and there's some little metallic purple bits on the forearms at the rear of the darker green paint. The Quintus Prime sigil is printed in copper on the Emberstone in keeping with the usual "sigil on artifact" motif.
The neck is a ball joint with the socket in the head, but the collar restricts the range of motion pretty significantly. Smooth waist swiel. The main arms have lifting struts connecting the shoulderpads via swivels, more hinges between the shoulderpads and inner shoulder pieces, bicep swivels,
hinge elbows, and very stiff wrist swivels. The secondary arms only have shoulders, which are pinned hinge and swivel universal joints. The skirt is split into five pieces (two front, two side, one back) attached with hinges. The hips are pinned hinge and swivel joints, there's swivels just above the hinge knees, and the ankles have both forwards/backwards and instep hinges.
Of course, with the skirt panels down, the legs don't have a lot of room to move. The back panel opens up to let you remove the Emberstone or put it
back in, but there's no good place to grip it (pushing the Emberstone peg all the way in from the front starts it opening, but unless you have tiny fingers you'll need a tool to push it far enough to really help).
All four fists can hold 5mm pegs (the secondary arms can line up so that both of those fists can grip a single peg if it's long enough), there's 5mm sockets on the soles of the feet, and one in the small of the back (useful
for inserting a 5mm peg accessory to make a handle for opening the back up). There's a 3mm socket in the back of the pelvis, with the tentacles providing just enough of a gap to let something not-too-wide sert for a tamashii-style stand to let him hover. The secondary arms end in bulbs tipped with 3mm
studs. There's also 3mm studs sticking out by the elbows of the secondary arms, but those are for helping keep the arms in place in altmode.
The Emberstone is, sigil aside, unpainted neon yellow plastic faceted
like a natural crystal (or an unnatural one). A little over an inch (26mm) long including the 5mm peg, and the peg is rounded at the bottom so that when it sticks out through the chest it looks like a spark crystal or something along those lines. It kinda looks like an crystal pineapple. It normally stores inside the torso, where it provides chest lightpiping as well.
Quintus is clearly meant to live on a windowsill with a lot of sunlight, although that might cause bad photodegradation.
Transformation: Unfold the armor bits on the forearms, connect the arms over and around the head, fold some bits on the legs up and in so that the tentacle skirt pieces can tab in place in front and back, then rotate the
waist 180 degrees. The secondary arms can either be forewards as a sort of landing gear, or swung back around the tentacles. It's not exactly complicated, but a lot of the struts pop off very easily.
Going back to robot mode is a little easier since you don't need to line up tabs and slots, but the tabs can be pretty tightly stuck in there and the back of boot panels tended to pop off entirely before I could get them unplugged from the backs of the thighs.
Altmode: So, this is a sort of squid spaceship with a sort of bridge or cockpit at the back end of the fuselage before all the tentacles start.
Maybe more of a cuttlefish. Or a daikon radish. Well, not that, there's clearly mantle winglets near the front. Unlike the usual eight arms and two tentacles on a real squid, there's just the masses of not-tentacles numbering in the dozens. When folded back, I suppose the secondary robot arms would count as undersized "proper" tentacles (the pegs on their elbows do not fit into anything when folded back, despite being annoyingly close to going into sockets on the skirt-back hinge). The robot toes I guess are supposed to
look kind of like more not-tentacles here, although for all the stuff moved around the legs still really just look like legs sandwiched between layers of not-tentacle.
8" (20cm) long and basically the same colors as robot mode. The previously hidden struts between the forearms and their armor pads are now visible and made of the dull brown plastic. The cockpit piece on the small
of the back is now on top, it's neon yellow clear plastic.
The dark green painted bits on the forearms and forearm armor chunks now line up into a single U-shaped pattern on the nose, and while I often see
batch variation in plastics that is reflected in different UV response, this
is a rare case of the paint doing that...the right arm's paint ends up
looking olive drab under UV while the left arm's is nearly black. Much of
the cockpit is painted a slightly metallic dull green that I think is
supposed to match the dull green plastic. The metallic slightly yellowish green seen in various places is used in a bit in front of the cockpit piece. The bicep paint is turned inwards and is not really visible in this mode.
The painted parts of the skirt are supposed to be on top.
The secondary arms can be moved around and the cockpit can be opened (I have to use a knife, my fingernails aren't strong enough and the shape
doesn't allow a good grip otherwise), no other meaningful articulation. The top of the cockpit has a 5mm socket, probably the easiest way to open it is
to put something in the socket and use it as a handle.
The secondary arms can still grab 5mm pegs or put 3mm-stud-compatible
Fire Blasts on them although they tend to be aimed more to the sides. The
3mm socket in the back of the pelvis is somewhat accessible on the underside for the use of flight bases, although getting it through the tentacle skirt
can be tricky for some shapes of connector. I suppose technically the 5mm sockets in the soles are accessible, but not terribly useful the way the feet are pointed down as far as the ankles will go.
Overall: As "Primes whose body plans did not make it into the mainstream because they left on their own agenda" go, this is a pretty good design.
Sure, a squid-like Prime would make Quintessons and spread techno-organic
life all over the place, why not? Some of the tabs are difficult to line up, but they're not really NECESSARY in altmode. My only serious problem is the difficulty in opening up the back panel/cockpit.
AUTOBOT: SURESHOT
TARGETMASTER: SPOILSPORT
Assortment: G2005
Altmode: Off-road vehicle/Gun
Transformation Difficulty: 25 steps for Sureshot, 1-2 for Spoilsport.
Previous Name Use: G1 (a PCC weapon dude was redecoed and called Spoilsport
in Japan, though, and the European name for Hero Optimus Prime was
Sureshot)
Previous Mold Use: None
Origin Universe: G1
Yeah, we're digging deep now, into G1 characters who never got any new toys prior to 2026. The character did show up in media here and there, but I guess they never quite made it down the list of Targetmasters far enough
until now.
Packaging: A double tie across the chest and three single ties hold the robot mode into the inner tray. The plastic bag taped to the lower right has Spoilsport (in robot mode) and the spoiler pieces. The instructions do not include a "put the robot together" bit for the loose spoilers. The box
render is enough to figure out which one goes where, though.
The box render has the inner shoulder parts and shoulder roots in red plastic while the actual toy has them in orange.
Robot Mode: Your basic Neo-G1 blocky design with lots of extra details that weren't visible in the animation design (yes, he was in G1 "Rebirth" a little, and in the Japanese Headmasters series a bit more). While the proportions and most of the kibble (or lack thereof) of this toy fit the animation design pretty well, they did end up just sticking the spoiler
halves on the shoulders instead of making them part of the backpack. Since they're only pegged on, you can switch shoulders if you like, I prefer the looks of the spoilers angled upwards on the shoulders rather than down. Probably the only place where this design really falls down visually is the front of the pelvis, which has three open slots for joint swivel disk stress relief. A simple 3D printed plate that can tab in there is probably already available somewhere online, though. Otherwise, the color balance is pretty close to the original (mostly the animation version, which strips out most of the busier sticker elements). The head has a standard face with visor optics and a black helmet vaguely reminiscent of Starscream's with vents on the cheekpieces. The actual windshield is on the torso front.
5.75" (14.5cm) tall in mainly red, orange, and yellow with a little
black and some accent colors. Yellow plastic is only used for the torso
front and part of the backpack, the rest of the yellow is (kinda goopy)
paint. A yellowish orange plastic is used for the shoulder spoilers,
shoulder roots, torso top, forearm/fist pieces, pelvis, hip joints, part of
the backpack, and the feet. The head and the wheels (front wheels on the backpack, rear wheels on the backs of the boots) are black plastic. The
upper arms, thighs, boots, and a strut inside the backpack are red plastic.
The red and orange plastic glows strongly under UV, the yellow does not, but the yellow plastic does, so I expect the colors will look a little mismatched under sunlight. There's two types of red plastic, with a slightly duller version used mostly on joints.
The face is painted light gray with gloss bright blyue on the visor.
The forearms and the pelvis front and sides are painted over in very thick yellow paint, leaving the fists and various sockets and slots unpainted, but the hollow insides of the forearms are painted. The visible hubs of the
wheels are also painted yellow. There's silver bits on the belt in details that evoke some of the toy's stickers, and the windshield on the chest is
very light grayish gloss blue. There's a no-outline red Autobot symbol on
the sternum.
The paint on mine has some almost drool-like threads stretching away
from the face and the left forearm, suggesting a kind of goopy paint that didn't always come away cleanly during painting. In the case of the face,
only a little of it actually stuck to the helmet, the majority was a fine
gray thread that was easy enough to cut away with a small knife. The slop on the left fist was also easy to scrape off, possibly it wasn't fully bonded. Fortunately, both the helmet and fists are more of a matte plastic, so the scrapes aren't obvious.
The neck is a ball joint with the socket in the head and a cut in back
so the head can look straight up (it needs to look up a bit for transformation), the waist is a smooth swivel. Pinned hinge and swivel shoulders, bicpe swivels, hinge elbows, but no wrist articulation. Pinned hinge and swivel hips, thigh swivels mostly hidden inside thigh armor, hinge knees that can bend 90 degrees before the rear wheels get in the way. The ankles have hinges both directions, and on my copy they're very weak to the point the figure falls over backwards easily. I can unpeg the rear wheels
and push them down a bit to support the heels, but the glue trick did the job once I implemented it. (Put a little superglue in the joint, work it back
and forth until the glue dries.)
The fists can hold 5mm pegs, there's 5mm sockets on the outer faces of
the forearms, on the backs of the shoulders (dedicated to the spoiler
halves), on the outer faces of the boots, and under the heels. There's a vehicle-mode 5mm socket on the back that's hard to get at unless you fold
down part of the backpack (if you do this, Spoilsport can store here in robot mode, but it's the socket meant for him in vehicle mode). The rivet sockets
on the inner faces of the boots are also shallow 5mm sockets, which is a
weird choice since they're not accessible in vehicle mode. There's also 5mm sockets in the backs of the lower boots which are mostly blocked in this mode but are accessible on top of the vehicle flanks in altmode. Finally, there's
a 3mm socket in the back of the pelvis, near the bottom (it's completely covered in vehicle mode).
Spoilsport: Wow, this feels "bad knockoff" levels of cheap. Not just
the plastic feel, although that's a lot of it. The gun barrels are very
easily popped off during transformation either direction, and there's more hollow bits than even the usual level of modern Hasbro toys. Anyway, the general look is close to the original, but they went with a "barrels on the backs of the legs that fold down below the feet" design rather than the "barrels are connected to the upper thighs and stick up behind the back in robot mode" design of the original. Another difference from G1 is that the face is unpainted, while the G1 design had a red face (but no visor paint, so they kinda swapped here). Sadly, the gap between the barrels is way more
than 5mm, so you can't just pop the barrels out and jam them onto the back to better resemble G1 (and just look better in general, this design is a kinda
bad look aesthetically speaking).
A little over 1.75" (47mm) tall in red and black. The upper body is
black plastic, the legs and barrels are red plastic. The visor is painted
the same gloss blue as Sureshot's, but the face is left unpainted. The only articulation is at the hip, which is the transformation hinge. It's soft-ratcheting and takes eight not-quite-clicks to fold in half. The 5mm
peg on the back is blocked by the gun barrels.
Transformation is "fold the legs double, fold the barrels down until
they tab into place" as previously mentioned. If you press the barrels in
too much when going back to robot mode, they just pop off.
The gun mode is 2" (5cm) long with all red on top and black on the
bottom and the grip. The top has a lot of hollow parts, although to be fair
no more than the G1 version did. Not sure anyone's gonna bother making tiny gap-fillers for this, but I guess anyone who makes a pelvis plate for
Sureshot might pad out the kit with Spoilsport leg fillers. The 5mm grip peg is near the back end, and the twin barrels each end in a 3mm stud.
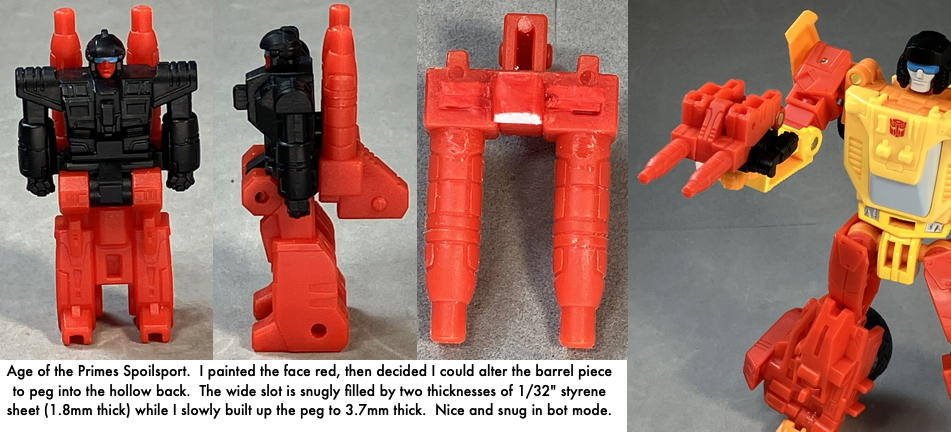
I was just going to paint the face red, but I ended up figuring out a
way to make the barrels peg onto the back in robot mode, so I did that.
https://www.dvandom.com/kitbash/spoilsportmod.JPG (a 3D printer could make it
a little more elegant, and print it in red).
Transformation: I didn't need the instructions, but it was a near
thing. The back end is very fiddly and relies on lots of pieces coming together in just the right places all at once in the right order. It's very hard to adjust something if you waited too long, and I had to do a lot of excessive force part-massaging.
Going back to robot mode isn't as hard, although getting the torso
halves spun around at the middle without the head getting in the way can be tricky. And in either direction, odds are good one or both spoiler halves
will fall off, since their pegs are kinda short.
Altmode: I suppose this is an improvement on G1, but that's not a heavy lift. There's a reason this one didn't get redone until four decades later. It's sort of a dune buggy in general shape, with larger rear wheels and
smaller front wheels, but it also has tiny canards in front and a spoiler in back, a driver's compartment in the middle that looks like it'd hold a driver 2-3 cm tall, making this rather bigger than a dune buggy (if not quite at monster truck scale). A lot of the details are just sort of random struts
and panels, making it almost look like a Construct-Bot vehicle in some ways. The colors are a mishmash that looks a lot less coherent than it did in robot mode.
5.25" (13cm) long in red, orange, and yellow with a very light blue windshield. The driver's compartment, hood, and front grill piece are yellow plastic. The weird struts flanking the nose end and holding the front wheels are orange plastic like the spoiler pieces and the forearms (which are now in back). The wheels are still black, everything else meant to be seen in this mode is red plastic. The yellow paint slathered on the forearms and wheel
hubs is still visible, as is a little bit of the painted belt area. The windshield is painted gloss light blue-gray, and the center hump of the hood and front grill are painted red. The Autobot symbol ends up on the roof of
the driver's compartment.
There's a 5mm socket in the center of the hood, one on either side
roughly even with the front of the windshield, and one on the top of each
side even with the rear of the driver's compartment (Spoilsport can go into
the side ones, but not these two). The fists can be used to hold exhaust- style Fire Blasts. The 5mm sockets on the soles of the feet are accessible
on the underside, but the forearm sockets are used in securing the transformation.
The wheels are snap-in, and on mine three of them spin freely but one clearly has some flash or something inside. They are not easily removed to address this, which is to say I stopped trying once permanent damage started
to feel likely.
Overall: Most of the problems with robot mode can be pretty easily fixed with minimal crafting skills, and they're not guaranteed issues on every
copy. Mostly decent robot mode design. The transformation is somewhat annoying, though, and the vehicle that you get from it is not exactly worth
the effort. Still, they did finally finish redoing the original non-retool Autobot Targetmasters (technically, Crosshairs was a minor retool of Siege Ironhide, while Pointblank was a new but probably heavily WIRNIR'ed mold).
DECEPTICON: BLAST OFF
Assortment: G2006
Bruticus Component: 2 of 5
Altmode: Space Shuttle/Bruticus Arm Candy
Transformation Difficulty: 17 steps
Previous Name Use: G1, G2, Uni2, Gen: FoC, Gen:CW (twice), RotF
Previous Mold Use: None
Origin Universe: G1
So, during Combiner Wars, Blast Off was a Quickslinger redeco, a jet instead of a shuttle. Then, at the tail end of the Prime Wars trilogy,
Hasbro imported the TakaraTomy mold that did in fact become a shuttle, but
was somehow worse at being a combiner limb (as evidenced by the fact I have mine just sitting next to Bruticus in vehicle mode).
Packaging: Five ties hold the robot to the inner tray, a plastic bag (I
do kinda miss the tissue) taped in the lower right has the pistols and the tail.
Interestingly, the "get it into robot mode" instructions don't mention
the fact that the toes start off pointed down in package. The box renders
make it look like the cockpit piece on the back is made of purple plastic,
but it only has purple paint on the side that isn't visible in the render
pose, oops.
Robot Mode: Well, he has the nearly peg-like head that marks a lot of Scramble City limbs. The hands are a bit weird because of how they're part
of the tip of the nosecone, and the toes are thrusters which was an
interesting choice. Generally blocky and animation-proportioned, an improvement over the spindly "vehicle mode doesn't know what to do with them" arms of the Combiner Wars versions. Generally dull in color, although the
box render tried to brighten it up a bit.
5.25" (13cm) tall in mostly dark brown and dark warm gray with some dark purple accents. I had to get out a flashlight to be sure of the plastic colors, because under my normal room lighting it's just a sort of brown-gray blob. Rough-surfaced dark brown is used for the shoulderpads, biceps, outer parts of the hip joints, feet (except for the toes), "shin bones," and a
hinge in the backpack. A glossier and slightly warmer dark brown is used for the head, forearms, thighs, backs of the boots, tail (but not its peg and hinge), back shells, and guns. The rest of the toy is a dark taupe that
looks more like dark gray under normal light.
The face, including the eyes, is painted dark silver. That's more or
less true to the animation model, I guess. Dark warm gray on the center of
the helmet (a bit sloppy, brown shows through on one side), I think it's
meant to match the dark taupe plastic. Glossy brown paint on the trailing edges of the wings on the boots, as well as on the belt buckle and a detail
on the lower pelvis. A sort of widened sternum area is painted dark purple, which is also used on the thruster toes and shuttle details on the undersides of the forearms. The sort of Naruto Headband bit on the forehead is painted heather purple, about the same shade as the Decepticon symbol printed in the center of the chest. The trio of thin oval depressions on the upper chest
are painted cool dark gray. The shins are unpainted, but the mold has the borders if you want to try adding brown bits to them as in the animation
model. It fits this reference picture pretty well except the purple is dark.
https://tfwiki.net/mediawiki/images2/a/a7/RevengeBruticus_BlastOff_Brawl.jpg
The neck is a restricted ball joint with the socket in the head, it can wiggle a little. If you need the figure to look up more, the entire base of the neck is a panel on a transformation hinge, it can fold back a little
before it starts looking weird. The waist is a smooth swivel, rather stiffer than my usual experience with the arm candy bots (whose waists tend to be a little wiggly otherwise). Yes, I'm calling them arm candy, they dont FORM arms, they just hang off of combiner arms. Pinned hinge and swivel
shoulders, bicep swivels, hinge elbows, swivel wrists (the fists are embedded in nosecone sections, so look kind weird on any side but the socket side). Pinned hinge and swivel hips, upper thigh swivels, hinge knees, instep hinge ankles. The toes can fold down for transformation, which can allow for some pose variation (particularly if on a flight base, so the toes point down as thrusters).
The fists can hold 5mm pegs but do not go all the way through. There's also 5mm sockets on the outer faces of the forearms, on the outer faces of
the boots (wing undersides) the lower shins (combiner connector sockets), and the undersides of the heels (so he can wear his guns as skates). Vent
details on the inner faces of the forearms are shallow 5mm sockets. The toe thrusters are a little too wide and flare outwards. There's a 3mm socket in the back of the pelvis.
The pistols are based on the G1 pistol, but without the side-mounted
clip. There's no vehicle mode side guns (Vortex has a shrunk down version of his, so it's not like only Voyagers get the bonus guns), just two pistols
which end up going under the wings in vehicle mode. Identical skinny
blasters a little under 1.75" (43mm) long made of the brown plastic. They
have short 5mm pegs near the back, and short 3mm stud muzzles. The instructions make several suggestions for placement, I like the forearm attachment rather than having them held as pistols.
While the tail piece is packaged separately, the instructions just have you put it on the back of the left boot and leave it there. I suppose it
can be held as a weird blade weapon. The fin part is brown plastic and the
peg root is dark taupe. There's dark gray paint on the rudder part of the tail. The tail part itself is about an inch (2.5cm) tall. Once it's pegged into place on the boot, it's quite firmly attached. The hinge is soft- ratcheting with 45 degrees per stable position.
Transformation: Pretty simple. The shins open up for the standard
"thighs collapse into the boots" move, the arms lift up over the head (which folds back into a gap in the back). The only difficult part about getting
back to robot mode is getting the head back out, in my case the joint is
pretty stiff and the opening barely wide enough for my index finger.
Altmode: You know, the purple camo of G2 Combaticons was rightly mocked
in general, but G2 Blast Off was at least mostly white, which is what is expected from a space shuttle. The murky browns and grays still look weird
to me, even after decades. Being pretty dark does at least make them blend better, under strong like the effect is kinda patchwork. Anyway, except in back it looks more Space Shuttle-y than the Combiner Wars shuttle version...
in back the transformation means there's four big thrusters instead of three big and two small. Also, the bottom pair of thrusters stick out almost a centimeter past the upper two, since they're folded-down toes.
A little over 6" (about 15.5cm) long with a wingspan of 4" (10cm) in a
mix of brown, dark gray/taupe, and purple. The brown plastic is mostly on th etop third and tail, the taupe mostly on the bottom two thirds and wings,
with the thrusters being the robot feet. There's dark purple paint on the
top of the cockpit area and some of the sides of the nose. The cockpit
window is the same heather purple paint as the robot's forehead. There's a very large (about an inch tall) violet Decepticon symbol on top of the
cockpit, and smaller ones on the wings.
Lots of 5mm sockets available on the underside. The fists, the inner
face forearms, the wing sockets and the shin sockets are all on the underside now. The upper faces of the forearms and the 3mm socket are hidden inside, however. The heel sockets are thrusters and can be used for Fire Blasts, or for 3P side guns if you want a more G1 look. (The fists and vents only hold the guns loosely, you're best off putting them on the wings where they're intended to go.)
The wings and tail are hinged, but not really meant as articulation in this mode. No landing gear or opening doors.
Combiner Mode: Like Vortex and the Superion arms, it splits in two via a push-in tab, with the front end on the upper arm and the rear part on the forearm. The wings fold up to get out of the way.
Overall: I don't really have any major criticisms other than the color scheme, and that's G1's fault. Could've been a little brighter, I suppose.
A solid design that does what it's supposed to, even if most of what it's supposed to do is split in two and attach to Bruticus's arm.
PREDACON: QUICKSTRIKE
Assortment: G2007
Altmode: Fuzor (Scorpion/Cobra)
Transformation Difficulty: 21 steps
Previous Name Use: BW, BMac, Energon
Previous Mold Use: None
Origin Universe: BW
This is the first new toy for the Beast Wars characters, Beast Machines Quickstrike was a non-show separate character, and Energon Quickstrike had no connection at all. I can certainly understand reluctance to put out a new mold, since there's literally nothing this can be redecoed into without actually making up something new for the redeco (like they did with BW Silverbolt's various redecos). Anyway, the original was a $5 Basic, now it's
a $28 Deluxe...and not a whole lot taller. (Annoyingly, I didn't list the robot mode height in my original review...looking back at my 90s reviews is a frequent source of annoyance at Past Me.)
Packaging: Eight oddly criss-crossed ties hold the robot into a plastic blister tray atop the card...he's just too gol-durned complicated to strap to
a card and be done with it. There are no bagged accessories.
While the instructions have six steps for getting it into proper robor mode out of the box, they don't include folding the beast face up onto the small of the back, which you also need to do.
Robot Mode: Interestingly, while the robot is definitely bigger than the original, the feet are only barely longer. Original Quickstrike's feet were too rassumfrassum big for his body. Also, while the original made extensive (and worrisome) use of clear plastic, there's none of that here. Okay,
enough of this, I dug out my original Quickstrike (which had amazingly not broken despite mostly being in a box lugged around the Midwest for decades)
and it's much smaller even though the only things I measured thirty years ago actually match the new toy. Anyway, this looks more show-accurate than the original, in part because the proportions are better, and in part because
they used a lot of pearly finish plastic to emulate the shiny look of 90s
CGI.
5.25" (13cm) tall at the head (compared to 3.75"/9cm for the original), 5.5" (14cm) to the top of the scoop behind the head. Dark brown, pale gold, teal, and orange, mostly shiny and some metallic. A dark brown plastic with
a slightly pearly sheen is used for the shoulderpads, upper arms, snake neck right arm, back/top of the snake cowl and head, back of the pelvis, hips, and thighs. Glossy teal plastic is used for the torso front and back, and pelvis front. Pearly orange plastic is most prominent as the beast legs that form
the giant left hand, plus the collar area, shoulder roots, left elbow, hip struts, ankle hinges, and the 3mm stud piece inside the cobra's mouth. A pearly pale gold plastic is used for the head, left forearm stub, shins,
feet, underside of the cobra head, and the beast head acting as a butt plate.
There's somewhat dull gold paint on the chest and back, a so-so match
for the pearly gold plastic, and it's also used for details on the beast
head. There's metallic teal paint on the face and some of the head, the
sides of the valves, details on the toes, on the beast face on back, and as
the mask and cowl pattern on the cobra head. A bit on top of the head is painted bronze, as are the cobra fangs. The robot eyes, beast eyes, and
cobra eyes are gloss red. The inside of the cobra's lower jaw is metallic gunmetal. There's a purple Predacon symbol printed on a hemispherical bit on the center of the chest, possibly an homage to Spark Crystals.
The neck is a very stiff restricted ball joint, the waist is a smooth swivel (if you properly lift the headplate up, it doesn't get in the way of
the range of motion). Both shoulders are pinned hinge and swivel joints.
The right arm is a snake body with six ball joints between shoulder and cobra head, and the cobra jaw is hinge. The left arm has the eight beast legs as "hands" with stiff hinges to let each chunk of four move through about 90 degrees of range (soft-ratcheting with three stable positions in that
range). There's a swivel where the stump of a forearm meets the elbow hinge, and a regular upper bicep swivel. Pinned hinge and swivel hips, upper thigh swivels, and hinge knees. (The shins are very long and take up about 2/3 of the total leg length.) The ankles have the usual instep hinges, plus the
toes and heels are independently hinged because they become claws in beast mode.
The left arm stump ends in a 5mm socket, so sufficiently narrow Fire Blasts can be put into the closed "hand" and anything can fit if you open up the hand enough. There's a 5mm socket on the underside of the cobra hood,
one in the center of the back, and one under each toe. There's a 3mm socket
in the back of the pelvis, and a kinda short 3mm stud inside the cobra mouth (the original toy had a water squirting gimmick, which you can fake with an appropriate Fire Blast). The socket on the back is partly blocked by the headplate, but that can be moved back down easily enough.
I was asked to check whether the cobra head could be replaced by the stinger from the Kingdom Scorponok mold, but the socket sizes are too
different to make this work.
Transformation: In broad strokes it's the same as the original, which makes sense since there's not a lot of ways you can turn this robot into that Fuzor beast mode. There's some slight differences, a few more pieces to move (the shoulderpads actually flip up with hinges at the outer points, for instance) and some more pegs to secure stuff (the beast headplate pegs onto
the pelvis 3mm socket, and some tabs on the orange leg pieces go into a slot
on the underside). Some of the bits are hard to get moving due to smoothness and lack of grip points, but only the shoulderpads still gave me trouble on
the second time through. Once everything's tabbed into place, the result is very solid.
Altmode: Okay, so to go along with the second season of Beast Wars, the idea of Fuzors was introduced, where the beast modes were a blend of two different beasts due to corrupted scanning or something along those lines. Until now, the only Fuzor to really get any love past this one year was Silverbolt, although the other three Deluxes got to be Blentrons in the Japanese cartoon and Buzzclaw's mold got reused one year by BotCon. (I got a bunch of clearanced Basics and kitbashed them into various stuff.) Anyway, Quickstrike was the only other Fuzor to get into the Beast Wars cartoon (Tigerhawk was technically sold as Transmetal 2, and wasn't a Fuzor in the
same way as the others).
Quickstrike's fusion is a scorpion and a cobra, although it's not a particularly integrated combination as this is really just a scorpion with
the tail replaced by a cobra body and head. Venom is venom, though, but with the character's Wild West vocal affectation a rattlesnake would've been a better fit than a cobra.
If stretched out all the way it's about 11.5" (29cm) from claws to tail tip, about the same as the original, but the actual head and body section is rather bigger at 3.75" (9.5cm) long. The unfolded torso makes the carapace, the shoulderpads are sort of pods on the sides, the robot upper arms are
hidden but otherwise all the plastics and paints have been described. The
head and carapace are supposed to kind of blend together, but the paint and plastic colors are just different enough that this doesn't quite work
The head is pegged in place, but can lift up a bit on a transformation strut if you unpeg it. The claws have all the leg articulation, while the
rest of the limbs are locked in place. All of the snake arm ball joints are still in play, as is the snake jaw. The back 5mm socket is on top of the carapace now, the cobra head 5mm socket remains accessible. The ones from
the robot toes are kinda blocked unless you open up the claws all the way,
and the left arm 5mm socket is now on the underside. The 3mm socket is used
to lock down the head.
Overall: An improvement on the original in pretty much every way unless you REALLY like water squirter gimmicks, and a good toy on its own even
without the nostalgia...but this is the nostalgia line, so that's always a consideration.
AUTOBOT: JUNKION JALOPY
Assortment: G2009
Altmode: Junkion Car
Transformation Difficulty: 17 steps
Previous Name Use: None
Previous Mold Use: Legacy (repeatedly)
Origin Universe: G1
Okay, so the base mold is Scraphook, but this is mostly a tweak of Axlegrease, which I never actually got (as noted at the top). This has the head from Tow-Line, which was just Scraphook with a new head, but Axlegrease extensively changed the vehicle shape. I also own but have not opened Lockdown, the Star Raiders Capsule redeco of Axlegrease with another new
head. I will compare all mold changes and colors to Scraphook, though, other than "the head is from Tow Line."
Packaging: Four ties hold the core robot into the tray, with a rubber
band from backpack through toes keeping the legs from falling off in
package. The plastic bag taped into the lower right has sooo many pieces.
The engine gun halves (new), the exhaust pipes (old), the spiked tire (old)
and two pieces of the rear "window" cover (new). The "out of the box" instructions offer two ways to put it together, neither of which uses both of the window covers. The box render of robot mode has neither of those pieces
in place. Of course, with all the pegs and sockets, you can put them
wherever you feel like.
Color Swaps: Most of the gray becomes warm brown, but not all. The
fists, elbows, knee joints, torso top, and wheels are now black. The new
mold parts that were gray on Scraphook (vehicle side windows, sternum, engine gun) are burnt orange plastic. What was burnt orange on Scraphook is now a slightly metal-sheen medium gray, even on altered pieces like the thighs.
Brown plastic becomes bright red. The new rear window pieces are on the
burnt orange sprue with the side windows et al.
Paint Applications: The chestplate is painted burnt orange with fake-grill-like parts left unpainted, and the toes are also painted burnt orange. There's an Autobot symbol in red printed on the center of the chest, and yellow headlights on the toes. The faceplate and exhaust pipes are
painted silver (only the pegs and sockets unpainted on the pipes). The
visor, wheel shield spikes (except the broken ones), and mini-spikes on the shins are painted gloss red. The engine parts of the engine gun are painted gunmetal. There's yellow flames printed on the shins. The other paints are not very visible in this mode.
In vehicle mode, there's more yellow flames along the sides on the front fenders and the doors, and all three windows are painted silver over the
molded "random bars reinforcing the glass" sort of patterns. In this mode
it's also pretty obvious how sloppy the paint on the engine is. I may need
to fix that. The triangle windows on the sides of the rear window cover are molded but not painted, nor are the molded lights on the top of the
windshield. I may address those lacks when I fix the engine.
Mold Changes: New torso top and front, vehicle side windows, head (Tow Line's head), thighs, engine guns, shins, engine gun, and rear window
covers. It seems like a lot more, but when I tried listing the unchanged
parts the list was significantly longer, so there we are. Axlegrease and Lockdown seem to have all the same parts except for their heads.
The barrels of the new engine gun pieces end in 3mm studs, unlike the
ones they're replacing. There's two 5mm sockets on top of the thrusters
molded over the rear window, and the thruster nozzles themselves are also 5mm sockets (blocked if you put the spare tire on the 5mm socket there for it).
The thruster sockets are angled slightly downward which is not great for stability if these are meant to be speed boosters. Unfortunately, the rear bumper is the only centerline socket, so if you don't want the spare tire
there it'll be off-center (in case symmetry is important in your Junkions).
Other Notes: The back end remains a major hassle to transform, but
looking back at my review of Scraphook, I had a much easier time of it here.
I still ended up removing the arms, connecting them together, and then
cramming the result onto the back. You do need to connect the rear window thruster pieces before attaching them, as the tabs that connect them side to side don't really let you attach one at a time to the vehicle mode.
Overall: Junkions lend themselves to armybuilding even leaving aside the combination gimmick, and this is different enough from other versions of the mold to be worth picking up. Still has an annoying back third in vehicle
mode, though.
Dave Van Domelen, finishing this just ahead of another brace of Pulse orders showing up.
--- Synchronet 3.21e-Linux NewsLink 1.2